Within the Materialized Data Manager, use the data model manager to manage data models and set model security. Users do not have rights to manipulate any details of the models unless they added the model themselves to the system.
- The manager interface is almost identical the admin version for users who are administrators.
Using the Data Model Manager
Use the server tree on the left to find and select the data model you wish to manage. You can use the dropdown list to filter the data source type and quick search to find items by name.
General
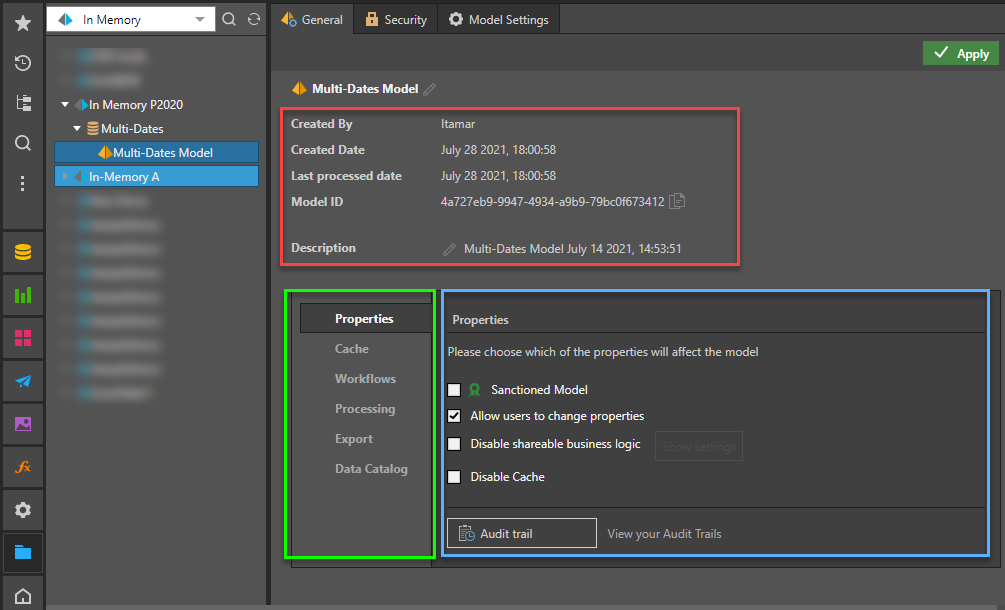
Once you have the model selected, you'll see the following items on the General tab:
Quick Discovery
When you are viewing your Model's General details, you can click the Quick Discovery button at the top-right of the page to create a new, empty, discovery in the selected Model. This allows you to get modeling right away, without having to open Discover, select a model, and so on.
- Click here for more information
Model Metadata
The Model Metadata (yellow box above) is specifically related to the Meta-structure:
- Created by: The user who created the data model.
- Create Date: The date the data model was initially created.
- Last Processed Date: The date the data model was last processed.
- Description: Any description added by the designer.
Properties, Settings, and Actions
The blue arrow in the preceding image drives the menu, and the green box shows the location of the settings or actions.
Properties
- Sanctioned Model: Select this checkbox to mark the data source with the Sanctioned certificate. This certificate appears next to the data model's name when it is opened in Discover, Formulate, or Present. This is a useful way to indicate to users which data models have been verified and reviewed. Note: this feature is not available in the Community Edition.
- AI-Generated Data Source: Select this checkbox to mark the visuals associated with this data source with the AI-Generated Icon in Discover, Formulate, or Present. This is a useful way to indicate to users which data models contain AI-Generated Content. For more information, see Identify AI-Generated Data Sources.
- Allow users to change properties: Select this option to allow users to change the metadata overlay properties.
- Disable shareable business logic: Select this option to disable the creation of sharable business logic (formulas, lists and parameters) by end users. Click Show Settings to select the user roles for which shareable business logic will be disabled.
- Disable Cache: if the data model uses ROLAP, you can check this option to forcibly disable all caching if you want to ensure that the query results are up to date (real-time), rather than cached. Only applicable for MS OLAP.
Cube Settings
These options only apply to MS OLAP and Tabular.
- Data model has NO data-level security: by default, cache is disabled for MS OLAP, Tabular, SAP BW and HANA models, to ensure that data-level security is not violated. If you DO NOT have data-level security in the cube, you can check this option to enable cache.
- Ignore cube-action access security for cells: by default cube actions are secured. Disabling this will lighten the action engine load and improve performance. Only applicable for MS OLAP.
Audit Trail: open the audit trail to see all changes made to 21 key objects throughout the system.
Cache
- Clear Meta Cache: clear the metadata cache for the current data model. This cache holds metadata related to database structures and models, extracted for queries. Caching metadata can have a significant positive impact on performance and should be used. It should be used with at least a time out of 1-3 hours.
- Clear Query Cache: clear the query cache for the current data model. This cache holds the results of any previously executed queries. This cache is recommended for solutions where the same queries are executed multiple times by multiple users. It should be used with at least a time out of 3-5 minutes. The main purpose of query caching is to accelerate the re-use of the same query result set without re-querying the underlying data source for the exact same results.
Workflows
If Custom Workflows have been enabled and custom workflow templates have been added, admins can decide how such items will be deployed throughout the app ("permissions"). If they are set to "Allow All Templates", then the templates are deployed universally. If, however, they are set to "Templates by Model", then the selection of which models will use which workflow templates is set in this panel. Since each model is secured by role and tenant, the workflows can be selectively applied with a very granular permission set.
Use the dropdown list to select which templates apply to the selected model.
- The Standard Conversations workflow always applies unless it's fully disabled in the admin settings.
Processing
In this section you can reprocess the data model.
- Process Type: Before clicking the Process button, select to re-execute all the data flow and data model steps select "Master Flow" . Otherwise select "Model Only" to reprocess the data model without the data flow and manipulation processing.
- Process Now: runs the reprocessing immediately by adding it to the queue.
- Schedule Processing: setups a schedule to reprocess the model.
Export
- Save as: choose this option to extract and save the definition of the materialized data model, and its ETL to the content system. This is useful if the data model's ETL was deleted or if you wish to extract the latest definition.
- Export: export the definition of the materialized data model and its ETL to a PIE file .
- Delete: delete the materialized data model. Note that the underlying database will not be deleted.
Data Catalog
- Export Data Catalog: download the data catalog as a JSON file. The file will contain the model's tables and columns listed by the fields "type", "uniqueName", "display Name", and "description". You can add or edit the "description" field.
- Import Data Catalog: import the data catalog after adding or editing the descriptions as needed. The descriptions will then be added to the semantic data model, and will appear as tooltips in Discover.
When finished, click Apply to save your selections.
Use the two cache buttons at the bottom to clear the current metadata cache or the query for the specific model immediately.
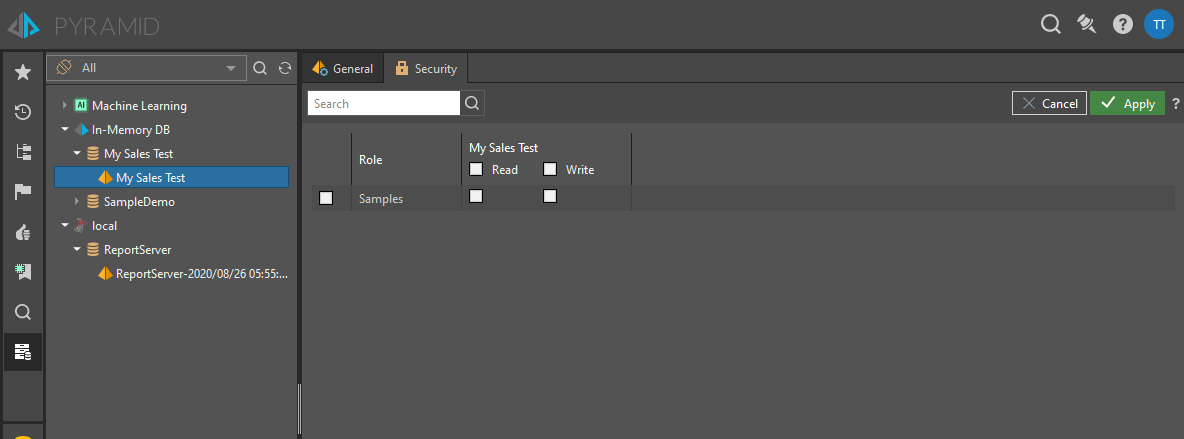
Security
For the selected data model, select the Security tab to manage access to this model by role.
- Select the roles that should be assigned to the data model.
- Read: users will be able to query the data model
- Write: user will be able to change the specific data model using the data modeling tools